
Gogs on Ubuntu 16.04
A couple of posts ago I was writing about software version control systems, and mentioned that I wanted to start learning Git in order to switch over to it. Part of the fun in it was using GitHub to store my public code, but I would also need some place to store code that I do not want to be public, and hopefully, also a nice web frontend to browse my repositories. I tried both GitWeb and cgit, and was thinking of trying to set up a GitLab instance just to give it a try. But a couple of days ago I learned of Gogs, or ‘Go Git Service’, which promised to be much easier to install than GitLab, and also looks quite nice and similar to GitHub.
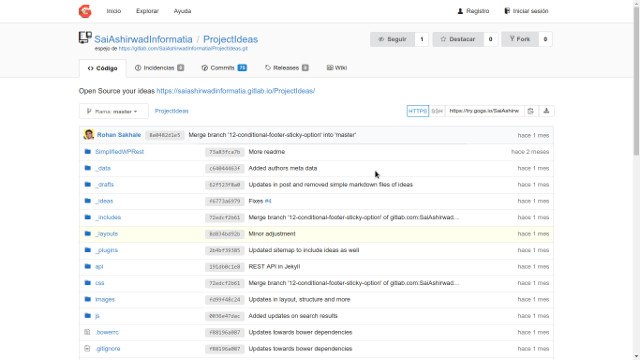 A sample repository in Gogs.
This is how I set it up, mostly by doing what is mentioned in the installation section of the Gogs website, but with some differences, due that at this moment, there is no compiled package available for Ubuntu 16.04. And also, some tweaks to adapt it to my setup.
1. Prerequisites
- A database. I still prefer to be conservative with the resource usage, so that I prefer to use a SQLite database instead of a MySQL or PostreSQL server, which would go heavier on my resources. As my repositories won’t have much traffic, SQLite should do well.
- Git.
- An SSH server.
I already had these three things installed in my system, so no commands this time :). Besides those, I also have a nginx server that I will be using as a proxy to Gogs.
2. Installing Gogs
Here is where the work starts: there are three options to choose from to install Gogs: packages, binaries and source.
As I said, there is no compiled package available for Ubuntu 16.04, so this is not an option. As for the binaries, since the Pine64 is based on an ARM processor, I would need a binary compiled for this architecture, but these do not support SQLite databases.
So the only option I had available was building Gogs for source. This was quite easy, despite I had never worked with the Go language before. Again, the instructions on the installation page showed the right way to go:
The first thing I did was creating a new user under which I would run the Gogs server. I made this a little bit different than it is indicated in the instructions:
$ sudo adduser --shell /bin/bash --system --home /var/lib/git --group --gecos 'git' git
I wanted to give the user a group with the same name, a system uid, and to create its home directory under /var/lib, since it would need to store some configuration and data. Also, I have changed a little bit my initial command, setting bash as shell, instead of using the --disabled-login option, as this would create some trouble with the SSH access later on.
My second task was to install a Go compiler. Again, instead of doing what the ‘official’ instructions said, I just installed the golang package included in the Ubuntu repositories. Also, to be able to compile with the ‘pam’ and ‘sqlite’ options, I needed to install the libpam0g-dev and libsqlite3-0 packages:
$ sudo apt-get install golang libpam0g-dev libsqlite3-0
After this, I found out that I needed to create an environment variable to point to a work directory where Go will store its files (sources, build files, etc). I added this variable definition at the end of the .bashrc inside my home directory:
$ echo 'export GOPATH="$HOME/go/"' >> ~/.bashrc
$ source ~/.bashrc
After sourcing my .bashrc file to set the variable, I was ready to download and compile Gogs. This was completely effortless. I have to admit Go is a charm for this. Just three commands, and in a short while, I had Gogs ready to be tested:
$ go get -v -u -tags "sqlite pam" github.com/gogits/gogs
$ cd $GOPATH/src/github.com/gogits/gogs
$ go build -v -tags "sqlite pam"
The first command downloaded Gogs from GitHub together with all the required Go dependencies. I needed to use the tag ‘sqlite’ to build with support for this database, and I added ‘pam’ just out of curiosity, to be able to try PAM logon.
With the second command, I moved into the directory where Gogs was downloaded, and with the third, Gogs was built using the same tags as in the download. When the compilation finished (without a single warning or error message), I had a gogs binary under my ~/go/src/github.com/gogits/gogs/ directory.
Next step: testing the binary. Just by issuing ./gogs web the application starts with a default configuration. You should see some lines in the console, indicating that the server is running, and you should be able to see the installation page if you open the address ‘http://[server]:3000’ in your favorite browser.
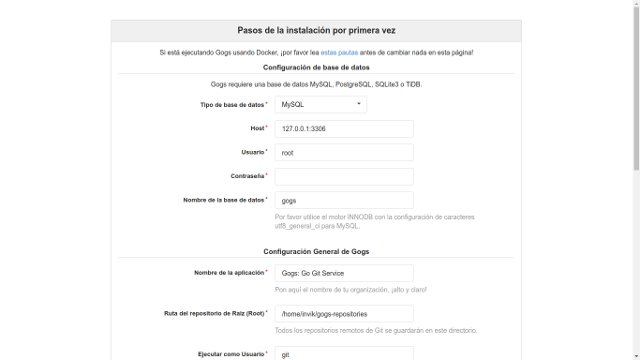 The installation page. If you get to see this, you are almost finished.
Now that we have checked that everything is working, we copy everything we need into a ‘gogs’ directory inside the home of the ‘git’ user we created before (remember that we will need to do this as root, as our user probably won’t have permissions to write into /var/lib/git):
$ mkdir /var/lib/git/gogs
$ sudo cp -fr gogs LICENSE public README.md README_ZH.md scripts templates /var/lib/git/gogs
3. Configuring Gogs
Do not bother in customizing the configuration yet. We first need to make some final arrangements in order to get our used to run the binary, and also set up things so that everything is stored under our user’s home directory.
Since we want to start the Gogs server at boot, we need to install a unit file for Systemd. There is such a gogs.service file under the scripts/systemd/ directory (remember, we still were in ~/go/src/github.com/gogits/gogs). Copy the service file to /etc/systemd/system/, and edit it to your needs:
$ cp ./scripts/systemd/gogs.service /etc/systemd/system/
After the edition, my gogs.service ended up looking like this:
[Unit]
Description=Gogs (Go Git Service)
After=syslog.target
After=network.target
#After=mysqld.service
#After=postgresql.service
#After=memcached.service
#After=redis.service

[Service]
# Modify these two values and uncomment them if you have
# repos with lots of files and get an HTTP error 500 because
# of that
###
#LimitMEMLOCK=infinity
#LimitNOFILE=65535
Type=simple
User=git
Group=git
WorkingDirectory=/var/lib/git/gogs
ExecStart=/var/lib/git/gogs/gogs web
Restart=always
Environment=USER=git HOME=/var/lib/git GOGS_CUSTOM=/var/lib/git/gogs

[Install]
WantedBy=multi-user.target
I have highlighted the parts you need to customize with your settings in bold:
-
User and Group are quite straightforward: the system user and group under which the Gogs service will run. Be warned that all the following paths need to have read and write permissions for these user and group.
-
The WorkingDirectory needs to be set to the directory where you want to store your configuration and work files. I have the impression that this setting is ignored, but better to set it right anyway.
-
ExecStart needs to be set to the path to your
gogsbinary, plus thewebargument. -
The USER and HOME environment are also straightforward: again, the user we created, and the home directory we set for it.
-
Finally, the GOGS_CUSTOM setting is not mentioned in the original instructions, but as I mentioned,
WorkingDirectorygets ignored, but we can still set the right value for the working directory with this variable. I set it to the same values as I ser forWorkingDirectory.
After copying and editing the file, we need to enable and start the service:
$ systemctl enable gogs.service
$ systemctl start gogs.service
Now is the time to go again to your browser and configure Gogs to your liking. After clicking the ‘Install’ button at the bottom of the page, an app.ini should be created inside a conf/ directory under the WorkingDirectory that you configured in the service file.
As a sample, here is the content of my configuration file:
APP_NAME = Invik's Git Home
RUN_USER = git
RUN_MODE = prod

[database]
DB_TYPE  = sqlite3
HOST     = 127.0.0.1:3306
NAME     = gogs
USER     = root
PASSWD   =
SSL_MODE = disable
PATH     = /media/usb/gogs/gogs.db

[repository]
ROOT = /media/usb/gogs/repositories
SCRIPT_TYPE = bash
PREFERRED_LICENSES = Apache License 2.0,MIT License

[server]
DOMAIN       = gogs.invik.xyz
HTTP_ADDR    = 127.0.0.1
HTTP_PORT    = 3000
ROOT_URL     = https://gogs.invik.xyz/
OFFLINE_MODE = false
ENABLE_GZIP  = true
DISABLE_SSH  = false

[mailer]
ENABLED = true
HOST    = localhost:25
FROM    = bot@invik.xyz
USER    =
PASSWD  =
SKIP_VERIFY = true

[service]
REGISTER_EMAIL_CONFIRM = false
ENABLE_NOTIFY_MAIL     = true
DISABLE_REGISTRATION   = true
ENABLE_CAPTCHA         = false
REQUIRE_SIGNIN_VIEW    = true

[picture]
DISABLE_GRAVATAR        = false
ENABLE_FEDERATED_AVATAR = true

[session]
PROVIDER = file

[attachment]
ENABLED = true
PATH = /media/usb/gogs/attach

[log]
MODE      = file
LEVEL     = Info
ROOT_PATH = /var/lib/git/gogs/log

[security]
INSTALL_LOCK = true
SECRET_KEY   = ***************

[cron]
ENABLED = true
RUN_AT_START = true
With this configuration I get:
-
The Gogs web service running on
http://localhost:3000. It is accessible overhttps://gogs.invik.xyz(thanks to some nginx proxying), and can also be accessed with Git over SSH atssh://git@gogs.invik.xyz. -
A SQLite database holding the configuration, located under
/media/usb/gogs/gogs.db. I did it this way to prevent data loss in case the system breaks and I have to reformat the SD card on which it is installed. -
The Git repositories, also stored on the same flash drive, under
/media/usb/gogs/repositories. -
Mail notifications through the
sendmaildaemon installed on the same server.
When I reached this point after my installation, I was able to access the server over HTTPS, but SSH kept complaining about the error fatal: Could not read from remote repository.. I was able to track it back to having specified --disabled-login when I created the user. As soon as I set bash as default shell, the problem was solved.
Finally, to conclude this post, a final example of my nginx configuration to act as a proxy for Gogs:
server {
    server_name gogs.invik.xyz;
    root /var/www/html;

    listen 443 ssl http2;
    listen [::]:443 ssl http2;

    ssl_certificate /etc/ssl/certs/letsencrypt_git_cert.pem;
    ssl_certificate_key /etc/ssl/private/letsencrypt_git_key.pem;

    location / {
        include proxy_params;
        proxy_pass http://localhost:3000;
    }
}
As you can see the communication between nginx and Gogs takes place over HTTP, but is served to the internet over HTTPS using a Let’s Encrypt certificate.
Leave a comment